
Color Temperature and Color Balance
Color Temperature and Color Balance
In order to achieve good color balance with studio flash, the user must understand the factors that affect the color.
Cameras with built-in flash need only establish color balance parameters from a single, unchanging flash source and are normally set to “flash” setting for proper color.
But color balance with studio flash is affected by a number of variables including the color balance of the flash units themselves, changes of color introduced by the shooting environment, changes caused by light modifiers, and the artistic perception of how colors should look in a shot.
The first rule of seasoned professionals is that there is no reliable camera setting that considers all of these factors. The assumption that all lights rated at a certain color temperature (such as “5600K”) produce the same color balance is incorrect. In particular, the “flash” setting of most cameras is not accurately matched to most studio flash systems. There is simply no automatic method of setting accurate color balance in the camera. Fortunately, there are two methods of easily achieving good color balance.
Custom White Balance
The proper method to do this in the camera is to follow the camera manual’s instructions for setting a Custom White Balance. When you do this, a test picture is taken with the lights set up and adjusted for the pictures you are about to take. The camera then calculates the appropriate adjustments needed to render neutral colors (greys and whites) taken in this lighting environment free of color casts and errors. Once this is done, the entire color spectrum will be reproduced as accurately as the particular camera allows. Using custom white balance is the preferred method of color balancing if you are shooting jpg pictures or when you wish to avoid post-processing of your shots.
RAW Capture
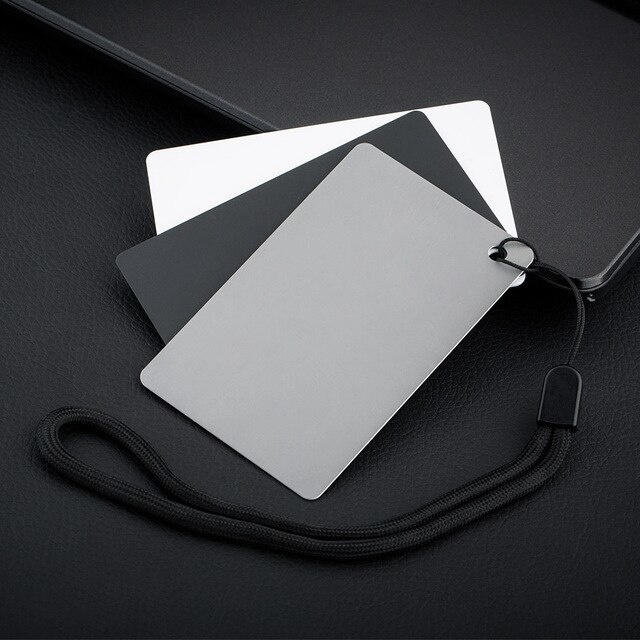
With the evolution of software programs such as Adobe Photoshop, most professionals prefer to shoot their important sessions with the camera set to “RAW” mode rather than jpg. This method saves the information directly from the camera sensor to the memory card, bypassing any processing in the camera. Thus, you can shoot spontaneously and avoid all color balance, contrast, and sharpness settings in the camera with the assurance you can more accurately set these parameters after the fact, in post-processing. A word of warning: Shooting in RAW cannot undo burned-out whites, out-of-focus shots, or improper ISO and shutter speeds settings from the camera and thus requires you to set these parameters properly in the camera. The proper method for shooting RAW is to make sure that you have a known-neutral object in the scene. If you are shooting a series of pictures under the same illumination, you can place a white or grey white-balance test card in the first shot of a series, then remove it for subsequent shots. Many shooters prefer to leave a white balance card at the top or bottom of every shot where it can be cropped out later, as this gives them the freedom to make significant changes in the lighting with the assurance each shot can be critically color-balanced in post-processing. If you are shooting against a neutral grey or white background, you can often omit the white balance card and use the background as a neutral object. But beware that all grey or white backgrounds are not truly neutral and that filters, gels, etc. must not tint the light falling on the background. The procedure for post-processing RAW shots is really quite simple.

In Adobe Bridge (part of Photoshop CS2 and CS3), you can open your entire folder of pictures. Select a picture that contains a white balance card and simply place the eyedropper tool on the white or neutral grey portion of the card. The software will instantly calculate the perfect color balance for the entire image. From there you can adjust contrast, exposure, cropping, sharpness, and other attributes of the shot. If you have shot a series of pictures under the same illumination, you can then copy and paste any or all of these parameters to all the other shots in the series.
In RAW processing, the original image data is normally saved to the hard drive and a copy of the image containing your adjustments is output to a new file as jpg, tiff, Photoshop, or another file type. If you are later unhappy with your post-processing it’s an easy matter to reopen the image in RAW, apply new settings, and output new final files. Smart shooters always archive their original RAW shots.
Does the use of various accessories affect the color balance?
It is quite possible for softboxes, brolly boxes, and umbrellas (as well as other fabric or paint-based accessories) to produce either warmer or cooler color temperatures, even from batch to batch. This is typical with most all fabric-based accessories - the vendor buys the fabric and the fabric supplier gets it from different batches. It's pretty hard to control - even for the most expensive brands. The same is true with basic flash color temperature and cameras. 5600K might be neutral on one camera and 300K-400K off on another camera.
There is also a green/red component of color balance that is not stated in the basic color temperature specs, so even an exact match in color temperature alone will not yield a perfectly neutral color balance. There is a lot of controversy about this subject, and the consensus is that one cannot rely on color specs or camera settings to achieve perfect color balance - with any lights or accessories. The consensus also is that all accessories will alter color balance by up to several hundred degrees. The only way to properly color balance is to do a custom white balance in the camera or, preferably, to shoot in RAW and color balance in Photoshop or another RAW program.


0 Reacties
Er zijn nog geen reacties, wees de eerste....