Syncing to the Camera and Sync Speeds
But it is difficult or impossible to set the built-in flashes on many cameras so they fire at the right time. Most digital cameras use a “preflash” to set automatic exposure, for redeye reduction or to determine color balance and other settings. Unless the preflash can be disabled in the particular camera, it will trip the studio flash units prematurely and they will not expose the shot. Many cameras, including the popular Canon Digital Rebels, have no facility to disable the preflash and therefore cannot be used to trip studio flash from the camera flash.
These cameras and many others also lack a standard sync terminal to connect a studio flash, but most cameras do have a standard hot shoe. In order to connect a sync cord to such a camera, you may need a hot shoe adapter. This adaptor provides a standard sync connection to which you can connect the sync cord provided with most studio flash units. However, the standard “PC style” photo sync cord connection is notoriously unreliable. They become loose, fall out, and make poor connections regularly.
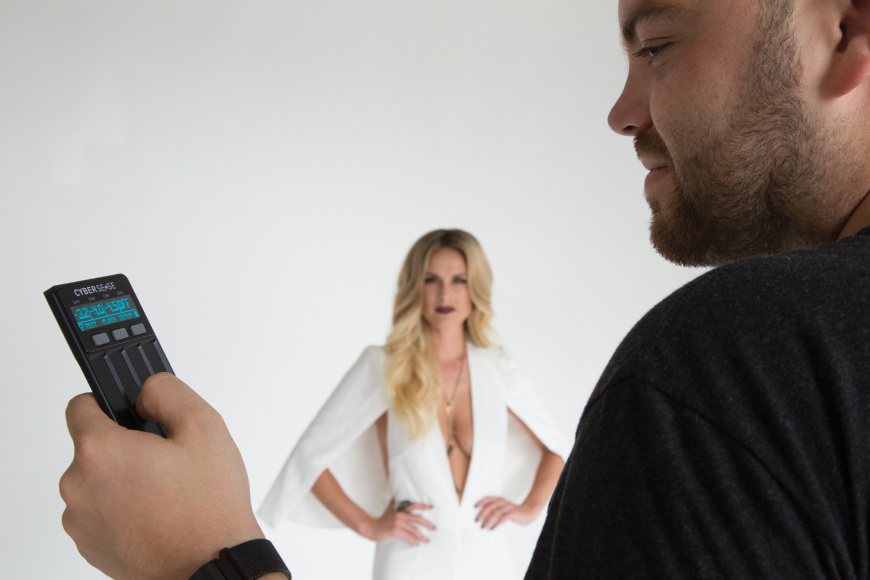
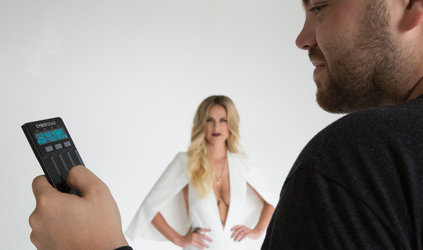
Remote Controls
Because of the unavoidable unreliability of the PC sync connection, we highly recommend our CyberSync™ Radio Remote Control System for syncing our studio lights to the camera. The tiny transmitter slides right onto the camera hot shoe and runs typically for a year or more without changing batteries. A CyberSync™ receiver may be attached to one of the studio lights and when that light fires, any other studio flash units will also fire via their flash-sensitive slave trippers.
If you wish to make flash meter tests from various positions in your shooting environment, it’s a simple matter to slip the CyberSync™ transmitter off of your hot shoe and carry it around with you to test-fire the lights. Or, you can invest in a second CyberSync™ transmitter expressly for this purpose as well as for backup.
If you are shooting in locations where other photographers are also shooting, you might want to use a separate CyberSync™ receiver for each of your lights and disable their slave trippers.
Setting Correct Exposure Times with Studio Flash
First, successful studio flash use normally dictates that you turn off all automatic functions in the camera and shoot in full manual mode with a fixed ISO setting (preferably ISO100 for the highest resolution and minimum noise). This will require you to set the aperture and exposure manually. A decent flash meter is the easiest way to determine proper aperture settings.
The Dreaded Black Band
Perhaps the most frequently asked question from studio flash users is “Why is there a black band across part of my picture?” The answer to this lies in the camera itself. Nearly all shooters are using cameras with focal plane shutters. The black band is caused by the shutter partially blocking the sensor when the flash fires.
Focal Plane Shutter Explained
A focal plane shutter exposes the image by moving two light-blocking curtains across the front of the image sensor. The first curtain slides open to begin the exposure, then the second curtain slides closed to terminate the exposure. In order to expose the picture from a flash, both curtains must be open at the time the flash is fired.
As you shorten the camera’s exposure time a point is reached where the first curtain is not completely open before the second curtain begins to close. The effect becomes a “moving slit” that slides in front of the sensor at this critical exposure time setting. Thus the camera maker specifies a maximum sync speed that assures both curtains will be completely open when the flash is fired. If the flash is fired at shutter speeds faster than the maximum flash sync speed part of the sensor will be blocked by one of the curtains and part of the shot will be blacked out.
The maximum flash sync speed varies from camera to camera, with most modern digital SLR cameras being rated between 1/125 and 1/250 second. In order to avoid the black bars, you must not exceed these speeds. You must also consider any delay that might be introduced by radio remote controls since these can introduce a small delay between when the camera sends the fire command and when the flash unit actually receives it. It is therefore prudent to set the camera shutter speed somewhat below the published maximum flash sync speed. If your camera is rated at 1/200 second, shoot at 1/125 second to avoid problems.
What Sync Speed Should I Use in the Studio?
Many shooters don’t realize that in typical studio usage it is almost solely the flash duration of the flash unit that determines action stopping. This is because the brightness of the flash is typically hundreds of thousands brighter than the ambient studio lighting and modeling lamps. So, even if you shoot at 1/30 second shutter speed, the ambient light is generally so much weaker than the flash that it doesn’t contribute to the exposure. Setting the shutter speed at 1/60 to 1/125 will almost always result in proper flash exposures with no black bars or motion-blur.
Combining Flash with Sunlight or Other High Ambient Light
This situation changes when you are using flash outdoors or in areas with extreme amounts of ambient light. Here, the contribution of ambient light can approach or exceed the flash exposure and must be balanced and controlled.
If, for instance, the camera meter reads f8 at 1/60 second from the ambient light and you wish to use fill flash to bring the subject illumination up to f11, you would meter the flash and ambient light together, increasing or decreasing flash power until flash and ambient light together reach f11.
If you shoot a test picture under these conditions and see that you need more flash and less ambient, you can adjust the flashpower upward and shoot at a higher aperture to get the proper exposure. You can also move the shutter speed up to say 1/125 and leave the flashpower alone. The change in shutter speed will lower the amount of exposure from ambient light but will have no effect on the flash exposure. You cannot, however, set the shutter speed faster than the maximum flash sync speed or areas that are covered by the sensor will only be exposed by ambient light, not flash, and will appear darker. This may or may not be immediately as noticeable as when in studio where all light comes from flash.
This is tricky stuff. It is recommended the shooter endeavor to understand the relationships between ambient and flash and shutter speed and aperture and ISO, then do a lot of practicing. There are many good books on the subject.
Sports Shooting
These relationships are particularly important when shooting in sports arenas where the ratio of ambient to flash is considerable and where stopping action is paramount. Here, the power and flash duration of the flash is important. The flash must overpower the ambient light and the flash duration must be fast enough to stop action. This typically requires a t.5 flash duration of 1/1200 second or faster for good action stopping with as much flash power as possible. Once again, shutter speeds faster than the camera’s maximum flash sync speed cannot be used to diminish the ambient light contribution or dark bars will result.
In high ambient light, you are still limited to your camera’s sync speed. If, at that speed, you get motion blur with ambient but no flash, that blur will still be present when using flash, regardless of flash duration.


0 Comments
There are no comments yet, be the first one to comment....